SQLeo Advanced Users Guide
Revised: 14/06/2012 by Alan Shiers
Revised:
28/09/2016 by PAscal
Table of Contents
More on the COMMAND EDITOR Window
The DELETE Tab of the Command Dialog Box
The INSERT Tab of the Command Dialog Box
The UPDATE Tab of the Command Dialog Box
Inserting and Deleting Records from a Table
Description of a Join Definition File
Introduction
It is assumed the reader has read the Beginners Guide for SQLeo. The topics covered in this guide provide an insight into some of the more advanced features not covered in the Beginners Guide.
Setting Preferences
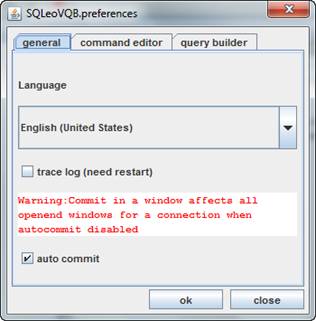
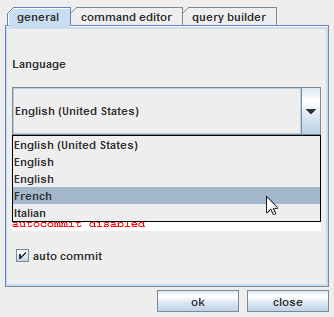
SQLeo supports three languages: English, French, Italian. The default is English, but if you wish to change it to one of the other options, you can do so in the Preferences dialog box. You can launch the Preferences dialog box by selecting the tools/preferences… menu item. See IMAGE 1. In IMAGE 2 you can see that the Preferences dialog box has three Tabs: general, command editor, query builder. We will discuss each one separately.
IMAGE 1

IMAGE 2
The General Tab
The General Tab of the Preferences dialog box is where you are provided with a drop down combo box to select a preferred language. See IMAGE 3.
IMAGE 3
In the image we select the French option and click OK. The change does not happen immediately. To see the change, you must close out the application and restart it. After you have done so, you should notice that only some of the menu items have changed to French. At the time of this writing, SQLeo was still in BETA and not fully translated, so you may find some discrepancies. See IMAGE 4. In IMAGE 5 we see that the tooltips for the buttons are still in English. This is one of the priorities we intend to rectify as we move forward in development on this project.
IMAGE 4
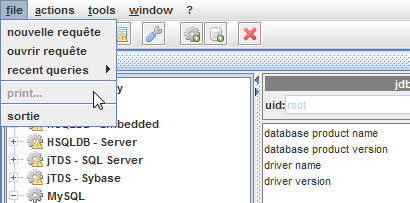
IMAGE 5

[Mention something here regarding the Trace Log option and the Auto Commit option]
At this point, we will return the language preference back to English and discuss the remaining Tabs in the Preferences dialog box.
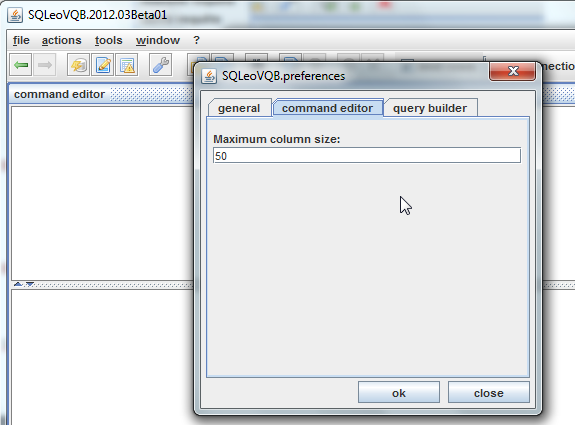
The Command Editor Tab
The second tab in the Preferences dialog box deals with the Command Editor window. You may recall this is the window in SQLeo where you can type ad-hoc queries. With the Tab open as in IMAGE 6, you have only one option you can change. There is a textfield labelled Maximum column size. As a rule the default value of 50 is adequate in most cases, however you have the option to change it here. The column size this refers to has to do with the number of characters you can type in the upper pane of the Command Editor.
IMAGE 6
The Query Builder Tab
The Query Builder tab offers six options which you can turn off or on. See IMAGE 7 and the following points to further explain each option.
IMAGE 7

· auto join - draws joins in the Content pane of the Visual Query Builder window if a foreign key is found in a Table of the database or in a Join definition file
· auto alias – creates an alias for Tables and Columns automatically
· always quote identifiers - writes column names or table names with the quoting standard of the related RDBMS: " " or ` `.
· use schema name in syntax definition – allows you to have queries based on several schemas, the schema name is then used for table and column name.
· load table objects list at once – if checked, automatically displays objects list in designer mode in the lower left-hand portion of the window. If not checked, the list is built when the user selects schema and object types from the Metadata Explorer window
· auto select all columns – if checked, as you select an object, such as a Table, to be displayed in the Content pane of the Visual Query Builder, all Column objects are automatically checked or selected. If unchecked, none of the Column objects are checked or selected.
More on the COMMAND EDITOR Window
While the Visual Query Builder is fine for creating SELECT commands, you may find a time when you will need to perform more complex commands on the database. To perform commands other than SELECT you will need to have the appropriate RIGHTS or privileges on your user account. If you are reading this, we will assume that you do.
As you may well know, the SQL language is subdivided into other groups of commands often referred to as DDL (Data Definition Language), DML (Data Manipulation Language), DCL (Data Control Language), and TCL (Transaction Control Language). To refresh your understanding, the following is a breakdown of which commands fall under each category:
DDL:
1. CREATE – to create objects in the database
2. ALTER – alters the structure of the database
3. DROP – delete objects from the database
4. TRUNCATE – remove all records from a table
5. COMMENT – add comments to the data dictionary
6. RENAME – rename an object
DML:
1. SELECT – retrieve data from the database
2. INSERT – insert data into a table
3. UPDATE – updates existing data within a table
4. DELETE – deletes existing data within a table
5. MERGE – UPSERT operation (insert or update)
6. CALL – call a PL/SQL or Java subprogram
7. EXPLAIN PLAN – explain access path to data
8. LOCK TABLE – control concurrency
DCL:
1. GRANT – gives user’s access privileges to database
2. REVOKE – withdraw access privileges given with the GRANT command
TCL:
1. COMMIT – save work done
2. SAVEPOINT – identify a point in a transaction to which you can later roll back
3. ROLLBACK – restore database to original state since the last COMMIT
4. SET TRANSACTION – change transaction option like isolation level and what rollback segment to use
While you may wish to try your hand at manually typing these commands in the COMMAND window of SQLeo, there is way to help you get the syntax correct when it comes to three of the DML commands: INSERT, UPDATE, and DELETE.
The DELETE Tab of the Command Dialog Box
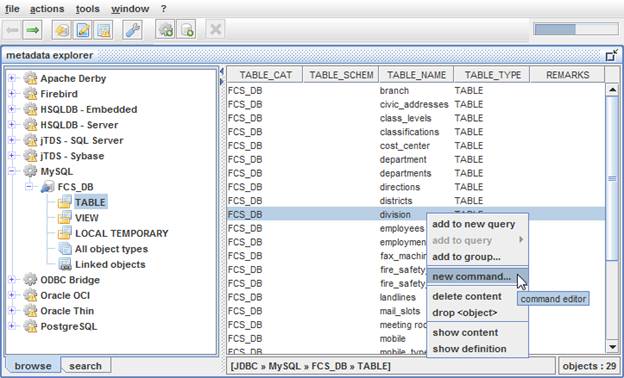
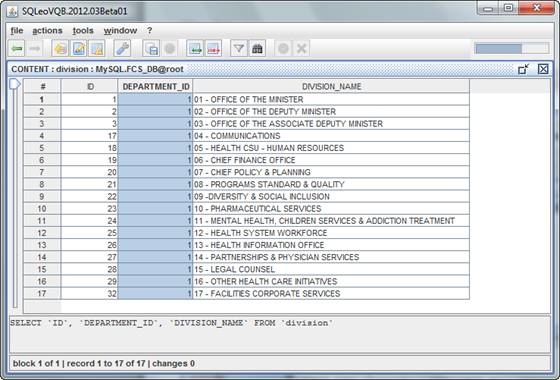
As it happens, we have a division that has become obsolete; therefore we are going to remove it from the division Table. See IMAGE 8. If we have a look at the data in the division Table itself we can see its structure in the CONTENTS window. To call up the CONTENTS window return to the Metadata Explorer, right click on the division Table and select the show content… menu item.
IMAGE 8 
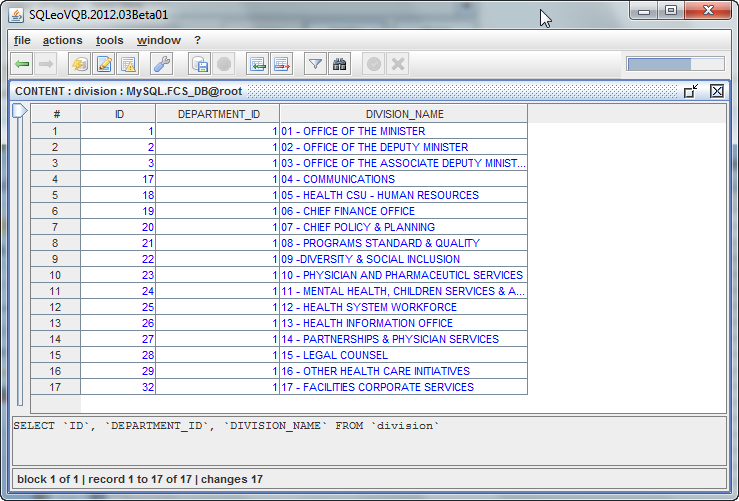
Of all the items listed, the last item under the DIVISION_NAME column labelled “17 – FACILITIES MANAGEMENT AND LOGISTICS” is the division that we wish to delete from the Table. Take note that the ID value for this record is 31. We will need to know this later.
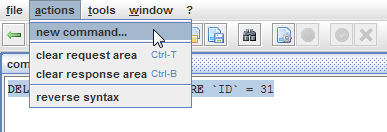
Let us begin from the Metadata Explorer window and select the division Table again from the FCS_DB database. See IMAGE 9 and note that we are using our right mouse button to select the menu item labelled new command…
IMAGE 9
This will bring us to the COMMAND EDITOR, but at the same time, it opens a dialog box with three Tabs labelled: delete, insert, and update. See IMAGE 10.
IMAGE 10

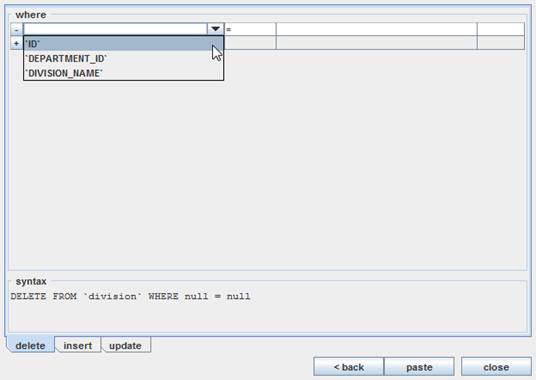
The default Tab is delete. We click on the + symbol to create a new WHERE clause for our DELETE command and from the first drop down combo box we select the ID column. See IMAGE 11.
IMAGE 11
We will leave the equals operator as it is. However, note that the operator can be changed to <, >, <=, >=, <>, LIKE, NOT LIKE, etc. In the second field we will type the ID value of 31, which is the ID for “17 – FACILITIES MANAGEMENT AND LOGISTICS”. See IMAGE 12 for a completed DELETE command.
IMAGE 12
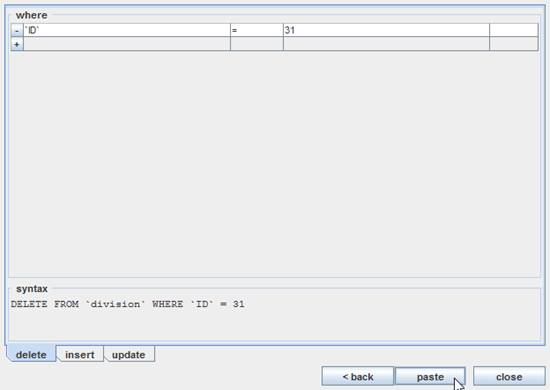
Notice in the syntax area of the dialog box it displays the correct form of the DELETE command. We click on the paste button causing the command to be copied into the COMMAND EDITOR window. See IMAGE 13.
IMAGE 13 
All that is left is to launch the command.
To do this, we click on the launch ![]() button. As a response from the database, we see in the lower pane of
the COMMAND EDITOR window how one row has been affected. See IMAGE 14. At this
point we have successfully deleted the record with ID 31.
button. As a response from the database, we see in the lower pane of
the COMMAND EDITOR window how one row has been affected. See IMAGE 14. At this
point we have successfully deleted the record with ID 31.
IMAGE 14 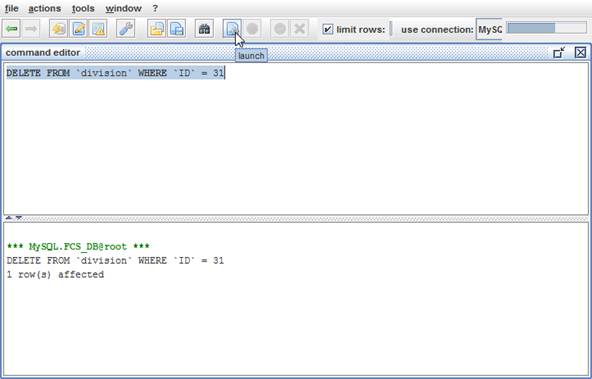
The INSERT Tab of the Command Dialog Box
You may remember from IMAGE 9 that we accessed the Command Dialog box directly from the Metadata Explorer window by selecting a popup menu item. If you don’t wish to be moving back and forth between windows, there is another way to access the Command Dialog box from inside the COMMAND EDITOR window. Simply select the actions/new command… menu. See IMAGE 15.
IMAGE 15
Calling up the Command Dialog box in this manner causes the dialog box to display an initial step requiring you to select from which objects you intend use the command on. See IMAGE 16.
IMAGE 16
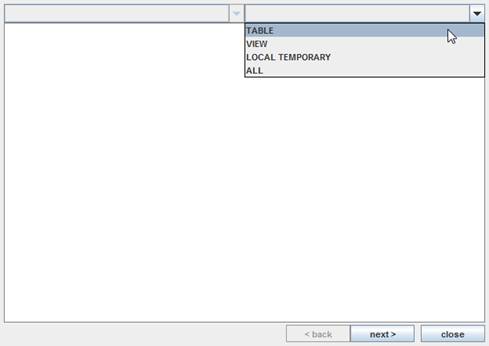
We will select Table from the drop down combo box which displays all the Tables in the FCS_DB database. See IMAGE 17. We select the division Table and click the next> button to move to the next step.
IMAGE 17 
When we get to the next step, we select the insert Tab. See IMAGE 18. We wish to insert a new record into the division Table. Note that we removed the check from the checkbox for the ID column. This is because the ID column is set to autoincrement by 1. In other words, a value will be automatically assigned by the database to this column when a new record is inserted. We assign an integer value of 1 for the DEPARTMENT_ID and for the DIVISION_NAME we enter “17 – FACILITIES CORPORATE SERVICES” in quotes. We use quotes here because this column is of type VARCHAR or STRING. Now that we have entered all the pertinent data, we will click on the paste button.
IMAGE 18 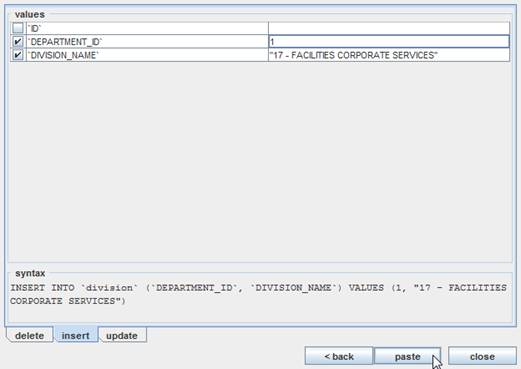
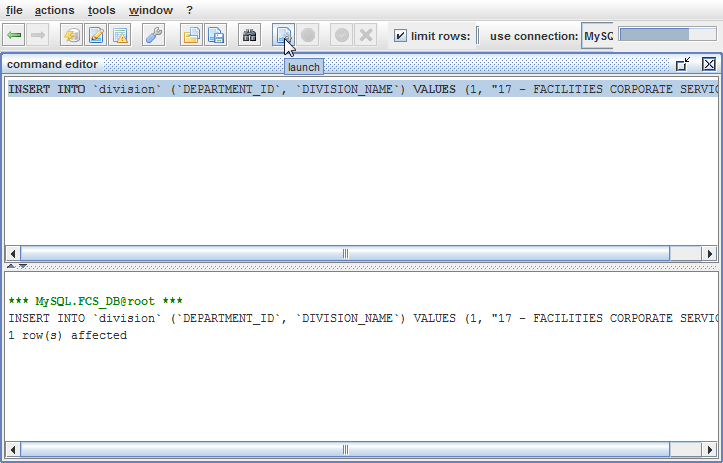
Once the SQL command is in the COMMAND EDITOR window, we can launch the command. See IMAGE 19.
IMAGE 19
To prove that the insert has worked, we have a look at the division Table in the CONTENT window. See IMAGE 20.
IMAGE 20
The UPDATE Tab of the Command Dialog Box
For the UPDATE command we will change the record with ID 23 from “10 – PARMACEUTICAL SERVICES” to “10 – PHYSICIAN AND PHARMACEUTICAL SERVICES”. We follow the same steps as depicted in IMAGES 15, 16, and 17. Then we choose the update Tab in the Command Dialog box and fill in the appropriate fields as in IMAGE 21 and click the paste button.
IMAGE 21 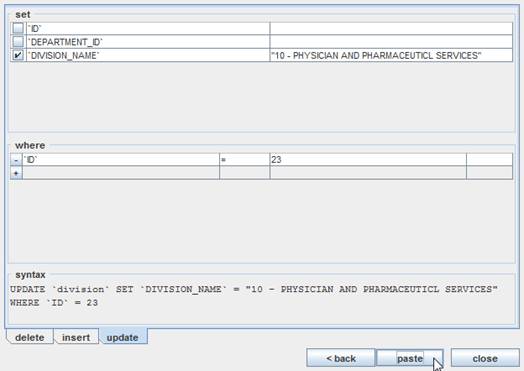
In the COMMAND EDITOR we click the launch
![]() button
once again and get a response from the database that 1 row has been affected.
See IMAGE 22.
button
once again and get a response from the database that 1 row has been affected.
See IMAGE 22.
IMAGE 22 
To further prove that the change has taken place, we have another look at the CONTENT window. See IMAGE 23. The record with ID 23 has changed with the updated DIVISION_NAME: “10 – PHYSICIAN AND PHARMACEUTICAL SERVICES”.
IMAGE 23 
More on the CONTENT Window
Inserting and Deleting Records from a Table
Content Window has a specific set of buttons:
The insert record button ![]() will allow you to insert a new record, while the delete record
button
will allow you to insert a new record, while the delete record
button ![]() allows
you to remove any record in the Table. The filter
allows
you to remove any record in the Table. The filter ![]() and find
and find ![]() buttons
we will discussed later.
buttons
we will discussed later.
IMAGE 37
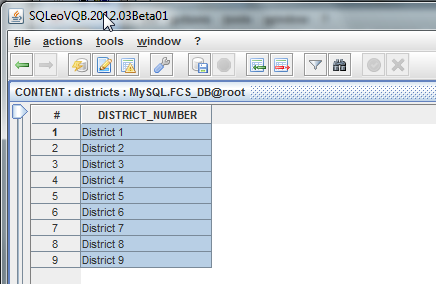
In this window, it not only displays the data in the districts Table, but it also allows you to make changes to the Table. This is assuming you have the appropriate RIGHTS or privileges to make those changes in accordance to your user account on the database system. We have complete access to our database so we can show you some of the possible changes you can make to the Table from this window. The fields under the Column named DISTRICT_NUMBER can be edited. The values displayed under the Column labelled with the hash symbol # cannot be changed.
Before we can implement any changes to this Table we need to tell SQLeo on which Columns we want to make changes. In this case, there is only one Column. For this step, we select the actions menu and choose the submenu labelled update criteria… This will launch a dialog box as in IMAGE 38.
Note: If table has a Primary Key, its fields will be used by default for updates, if not update criteria (see in tools menu) has to be defined manually to tell the tool how to perform the data modifcation
IMAGE 38
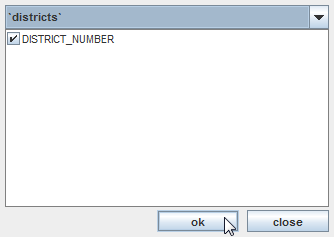
We place a check in the checkbox next to the Column named DISTRICT_NUMBER and click the OK button. At this point, if we implement any changes under the Column DISTRICT_NUMBER the changes will be recorded in the form of SQL statements. Before we commit the changes to the database Table, we will have a look at the SQL statements that were recorded. But first, let us make some changes.
We will select the ninth record. We will
insert a new record just below it. We can either click on the insert record
![]() button, or we can use the right mouse button to display popup menus.
One happens to be an insert record menu item. See IMAGE 39.
button, or we can use the right mouse button to display popup menus.
One happens to be an insert record menu item. See IMAGE 39.
IMAGE 39
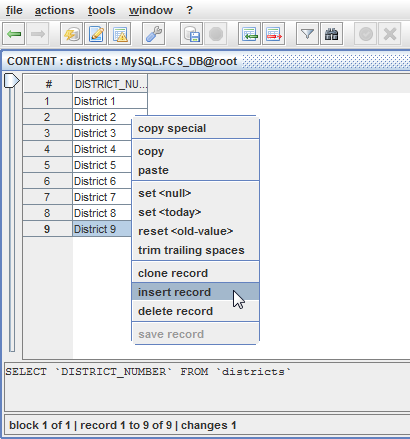
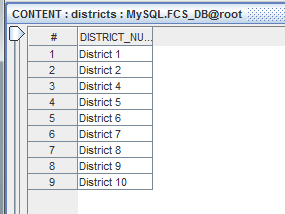
Take this time to note the other menu item options that are available for future reference. Notice there is a handy menu item labelled reset <old-value>. This has the same ability as an undo feature to return a prior value from a cell or field. After selecting the insert record menu, we obtain a new record item which is automatically given an ID value of 10. In the blank cell or field we type District 10. See IMAGE 40. Note that any changes made show in a blue font to indicate the change has not been saved yet.
IMAGE 40 
Before we save our changes, let us remove a record from this Table. District 3 is no longer required, so we will remove it. We right click on record three and select the delete record menu. See IMAGE 41.
IMAGE 41
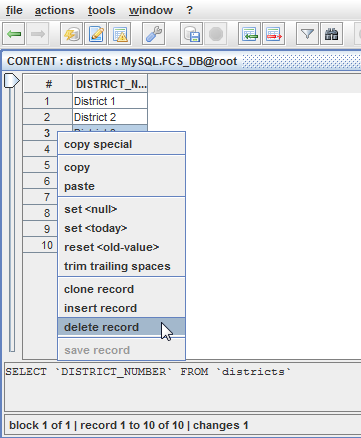
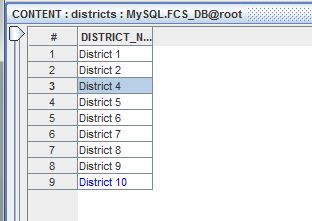
Right away the record containing District 3 is removed as in IMAGE 42.
IMAGE 42
At this point we can have a look at the SQL statements that will be applied to the database before we save our changes. We select the actions menu and select the show changes… submenu. This brings up a dialog box as in IMAGE 43.
IMAGE 43
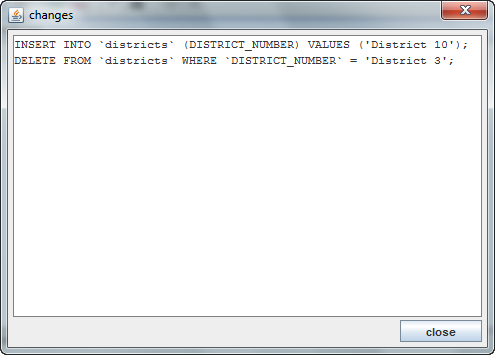
This is a good opportunity to look closely
at the syntax for inserting and deleting records from a Table using the SQL
language. We click on the Close button and now we can save our changes to the
database by clicking on the apply changes to db ![]() button. Once the changes are saved, any field that was edited and in
blue font will now display in a normal black font. See IMAGE 44.
button. Once the changes are saved, any field that was edited and in
blue font will now display in a normal black font. See IMAGE 44.
IMAGE 44
Exporting Data
Since we are in the Content window as in IMAGE 23, we will draw your attention to the actions menu. The list of submenus that appear under the actions menu when you are looking at the CONTENT window, are different than when you are looking at any other window. Most notably you have two significant submenus: export data… and import data…
IMAGE 24

We will examine each one starting with export data…
If you are a database administrator you may find these optional features handy for backing up the data. Currently we are looking at the division Table in the CONTENT window. To export the data from this Table, we select actions/export data… as seen in IMAGE 24.
This action brings up a two-step dialog box, the first of which appears as in IMAGE 25.
IMAGE 25

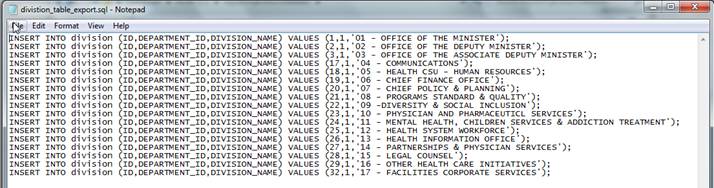
Please note the three options under the drop down combo box labelled Files of Type: insert statements, web pages, and text files. We’ve named our exported file division_table_export.sql. When we click the Next button, we see step two of the dialog box. See IMAGE 26.
IMAGE 26

We fill in the appropriate options and click the OK button. The file that results looks like IMAGE 27 as it appears in the Notepad text editor.
IMAGE 27
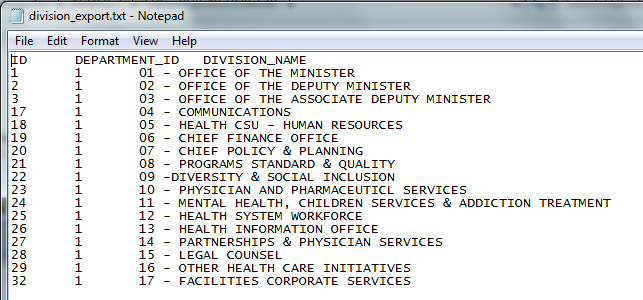
If we refer back to IMAGE 25, the remaining options create either an html file or a txt file, both of which contain the division Table in tabular format. See IMAGES 28 and 29.
IMAGE 28

IMAGE 29
Importing Data
Open the table data content
IMAGE 30

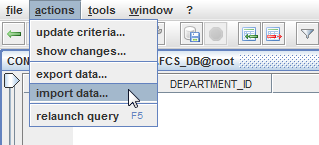
Then import a saved file by selecting the actions/import data… menu. See IMAGE 33.
IMAGE 33
Next, select the file that was exported earlier named division_export.txt and click the next button.
IMAGE 34

Choose additional options; however we will accept the defaults and just click the OK button. See IMAGE 35
IMAGE 35

The resulting CONTENTS window appears As in IMAGE 36. Note that all the records are in a blue font, indicating that the imported data has not been saved to the database yet.
IMAGE 36
At this point apply the data to the
database by clicking the apply changes to db ![]() button or edit the data further. Don’t forget to Commit transaction
!
button or edit the data further. Don’t forget to Commit transaction
!
Exporting to PivotTable.html
See http://nicolas.kruchten.com/pivottable/examples/
Using Join Definition Files
Database administrators are often aware that the server containing the RDBMS (Rational Database Management System) can become slow in its ability to respond under heavy traffic loads, especially if the queries being sent for processing are complicated in nature. For the power user who is familiar with dealing with exceptionally complicated queries and the performance impact it has on databases with many Tables and foreign key relationships, SQLeo provides a feature that allows you to cache foreign key information to a file that is local to your hard drive. In this way, the user is able to obtain faster results while the data processing is performed locally and not on the server side. This helps to take some of the load off of the RDBMS and provides the user with faster results.
Before we can explore this feature further, it is important to understand some basic concepts. Please read the next section on What are CSV files followed by Description Of A Join Definition File.
What are CSV files?
CSV is an abbreviation for comma-separated values. There are database systems that allow export of data in a format that can be manipulated more easily by other applications. Typically CSV files use the following criteria:
- They are plain text using a character set such as ASCII, or Unicode
- They consist of records (typically one record per line),
- with the records divided into fields or columns separated by delimiters (typically a single reserved character such as comma, semicolon, or tab; sometimes the delimiter may include optional spaces),
- where every record has the same sequence of fields.
A CSV file is a flat representation of the database where its common use is to move tabular data between programs that natively operate on incompatible (often proprietary and/or undocumented) formats.
A Join Definition file, in the case of SQLeo, takes the form of a CSV file. It doesn’t contain any table data, but instead contains a set of instructions arranged in tabular fashion, that describe how the tables are joined between primary and foreign keys.
Description of a Join Definition File
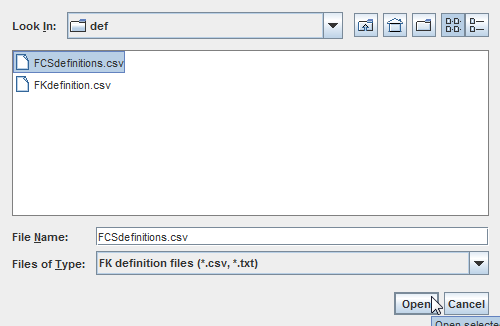
There is an example of a Join Definition file provided with the release of SQLeo. You will find it in the folder named def. The file you want to look at is named FKdefinition.csv. Let us have a look at the contents of this file.
join;join type;table owner;table;column;ref table owner;ref table;ref Alias;ref column;comment
DIM1_SOURCE;INNER;SYSTEM;DIM1;SOURCE_ID;SYSTEM;SOURCE;source_1;SOURCE_ID;
DIM2_SOURCE;FULL;SYSTEM;DIM2;SOURCE_ID;SYSTEM;SOURCE;source_2;SOURCE_ID;
FACT_DIM1;LEFT;SYSTEM;FACT;ID1;SYSTEM;DIM1;;ID;
FACT_DIM2;RIGHT;SYSTEM;FACT;ID2;SYSTEM;DIM2;;ID;
How you view this file is important. To the human eye, while it may appear to be a mess of characters delimited by semi-colons, it makes perfect sense to SQLeo. If you could imagine all of this in a cell separated spreadsheet, it would probably be more visually appealing. Such is the example below in IMAGE 37.
IMAGE 37

Now we see how the data is grouped into ten columns. The top row can be regarded as our HEADER. Each row below that provides a description of how each Table in the database is joined to another Table. Every join is given a name and the column named join displays these names: DIM1_SOURCE, DIM2_SOURCE, FACT_DIM1, FACT_DIM2. In the SQL (Structured Query Language) language there are four types of joins and each is represented in this example: INNER, FULL, LEFT, RIGHT.
This example is specific to an Oracle database. This being the case, the table owner column will refer to SYSTEM. Other database systems don’t have a reference in their schema for table owner or ref table owner. If, for instance, we were accessing a MySQL database, the cells under both these columns should be left blank. The table column is to display the name of a Table. The column column refers to which field in the Table is to be joined. So, if we were to examine the first record, we can see that table DIM1 and its field SOURCE_ID is joined to the SOURCE_ID field in another table named source_1 (which is an alias to the SOURCE table). ref column denotes the field being joined in the second Table. In the case of the first record, it is SOURCE_ID.
If you were to try to visualize the entire Join Definition file in the Visual Query window, it would look like this:
IMAGE 38

Refer to the Tables: source_1 and DIM1. The field SOURCE_ID in table source_1 is the primary key for table source_1. The field SOURCE_ID in table DIM1 is to be regarded as the foreign key. This join is noted as the first record in the join definition file. By comparing the remaining three records in the join definition file with the visual representation in the Query Builder, you can see how the rest of the primary keys of each Table is joined to the foreign keys of other tables.
CSV MODE
How do we create a join definition file? We will begin with another example using a different database.
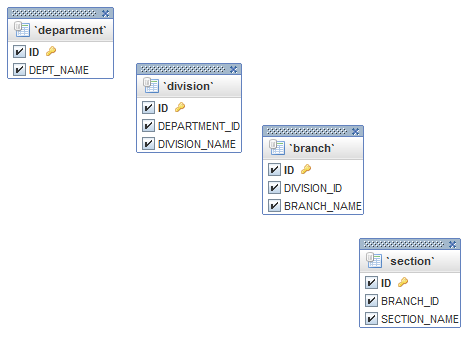
In government, there are so many offices that provide public service that these offices must be placed in categories of some sort of hierarchy. Often what you will find is the following hierarchy:
DEPARTMENT
|__DIVISION
|__BRANCH
|__SECTION
If we represent these in a database, then each becomes a Table unto itself. See IMAGE 39.
IMAGE 39
What we want to do is create a join definition file that links all four tables together. If you are using the Windows operating system, all you need to do is open a plain text editor named NOTEPAD. Without writing anything in it, simply save it to the def directory. Give the file an appropriate name so that you can find it in the next step. In our case, we named our file FCSdefinitions.csv. Be sure the file extension has .csv on the end.
Before we begin, you should ensure that certain preferences are set for the Query Builder:
1. auto join ON
2. auto alias OFF
3. use schema name in syntax definition ON
See IMAGE 40.
IMAGE 40

The database we will be using is named FCS_DB. Have a look at IMAGE 41. Notice that the FCS_DB database is highlighted. It has been selected, but it is not yet connected.
IMAGE 41

Notice also, at the bottom of the content window, there is a checkbox labeled Join definition with a button next to it labeled choose file. At this point we want to go into what we call the CSV MODE. To do this, we check the Join definition checkbox and click on the choose file button. See IMAGE 42.
IMAGE 42
![]()
We then get an OPEN dialog box as in IMAGE 43. We select the file FCSdefinitions.csv and click the Open button.
IMAGE 43
Immediately we will get a popup reminder as in IMAGE 44.
IMAGE 44

We close this and proceed to connect the FCS_DB database as in IMAGE 45.
IMAGE 45

Once connected, we are in CSV MODE. Any information that exists inside the file FCSdefinitions.csv will be used to define all joins. At this point, however, there is no information in the file. Our next step is to create the joins and save them to the file.
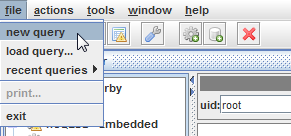
We begin by selecting the File/New Query menu. See IMAGE 46.
IMAGE 46
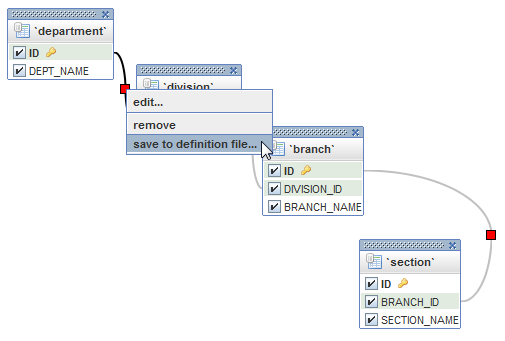
In the Visual Query Designer window we drag and drop the Tables: department, division, branch and section. See IMAGE 47. At this point, we can create our joins from primary keys to foreign keys. This action is done using the left mouse button and dragging a line from one table to another.
IMAGE 47

Now we get to save our joins. You will notice that each join line has a red square in the middle. We will right click each square of each join line, one at a time, and bring up a popup menu labeled save to definition file… See IMAGE 48.
IMAGE 48
At this point, if we were to have a look at the contents of the FCSdefinitions.csv file in NOTEPAD, it would look like this:
SQLeo_DEPARTMENT_DIVISION;INNER;;department;ID;;division;;DEPARTMENT_ID;
SQLeo_DIVISION_BRANCH;INNER;;division;ID;;branch;;DIVISION_ID;
SQLeo_BRANCH_SECTION;INNER;;branch;ID;;section;;BRANCH_ID;
Those three lines encapsulate all three joins connecting the four Tables: department, division, branch, and section.
In future, when we launch SQLeo and open the FCS_DB database in CSV MODE, SQLeo will automatically load these join definitions and you’ll be able to launch your query without calling the JDBC drivers that communicate with the database system on the server, and you won’t have to recreate the joins. This particular query is not complicated, but when you are accessing many more tables and trying to create joins between them, having a join definition file and a CSV MODE certainly makes the job easier.